ECMlink switchable tunes write up!
Page 1 of 1
 ECMlink switchable tunes write up!
Alright guys, a member on here wanted me to do a write up on the switchable maps mod for a 1g. It is similar for a 2g just uses a different wire for the switch. (If needed I can figure it out and add it later on). This mod is done using ECMlink v3, and is only a feature in v3. I do not have any pictures of me cutting and connecting the connectors as it is relitavly easy and you all should know how to do it, if not you shouldn’t be attempting this mod, let alone trying to mess with a DSM! Alright, on to the mechanical set up.
Some things you will need is some 16 ga wire, one male spade connector, 2 females spade connectors, one eyelet terminal, and 1 on/off switch (your choice to use what kind you want, I chose a duckbill style), some wire cutters, terminal crimpers, and wire strippers. You can also solder it if you choose, which would be the better option, but at the time I did not have soldering supplies so I did this, if you choose to solder you will also need a soldering iron/gun of your choice, soldering wire, and shrink wrap. Also a heat gun or hair dryer.
Fist thing is to unplug the Idle validation switch from the TB. It will be the one wire sensor where the throttle cables go to pull on the blade. Leave the sensor there though as it functions as your throttle stop as well.

Take your wire and feed the uncut end through your firewall. I used the hood latch grommet and fed it through there.
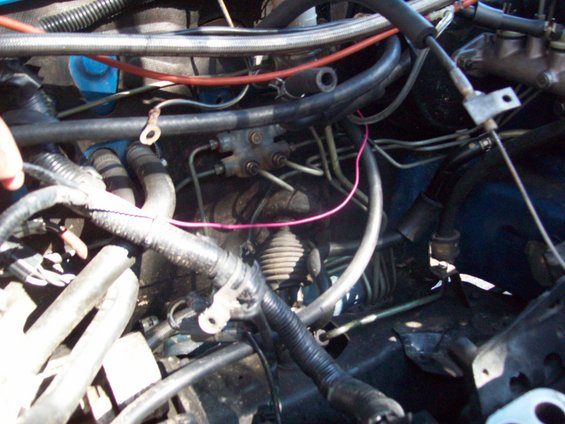
Once through, pull it too behind the IM and to where the end of the wire is that goes to the validation switch. Strip the end and connect the male spade connector and crimp on. Then connect them and wrap in electrical tape. Zip tie to existing harness to keep out of the way.
Solder: slide shrink wrap on to the wire you fed through the firewall. Cut off the female connector on the existing harness side and strip the wire. Use soldering technique of your choice and then slide shrink wrap over and shrink using a heat gun or hair dryer. Zip tie to existing harness to keep out of the way.
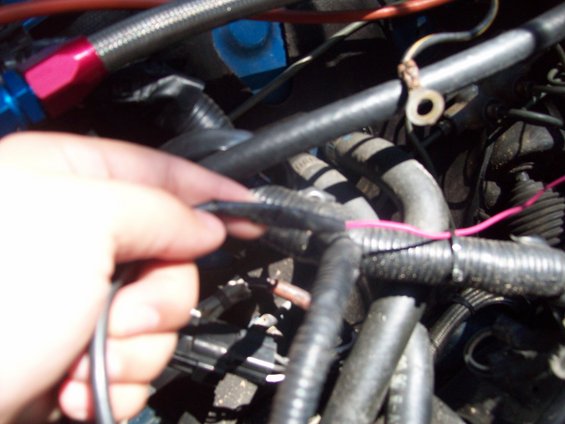
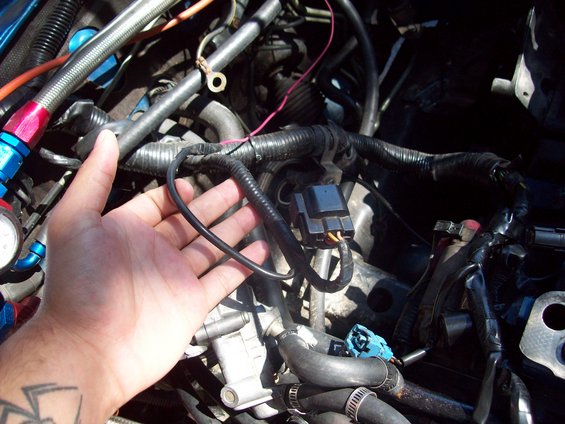
Now you are done in the engine bay, now we can move inside. You may place your switch anywhere you want in the cabin that will be easily accessible to you, but still out of the way and maybe sight that way no one is tempted to mess with it. I chose to do it on the driver side kick panel.

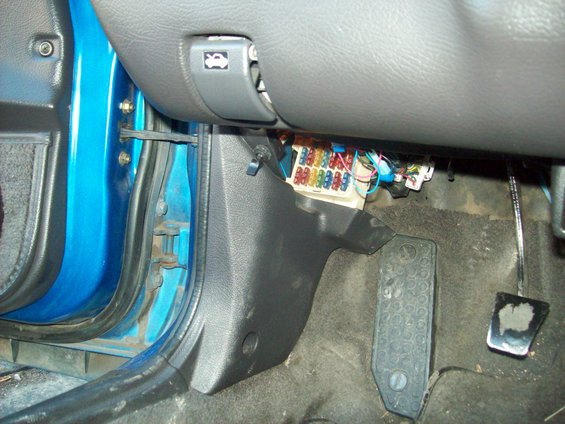
So far no one even knew it was there till I told them. The color of the switch itself very well matches the interior color so it almost is camoflauged. Take the wire you fed through the fire wall and rout it out of the way of pedals and tie up using zip ties. Cut it to length so it will reach the back of the switch in your chosen routed path. Strip the end and put a female spade connecter and crimp. Plug it in to one side of the switch. Then cut enough wire off your roll t o reach from the second terminal of the switch to a grounding point under the dash, I chose to use an existing factory ground behind the kick panel. If your switch does not indicate on or off, use a DMM to check for continuity. You need to know which way is open (off) and which one has continuity (on).
That will finish up the Mechanical part, the next part is all in ECMlink program.
When using the dual maps, you are going to have two different fuel settings. One for (assuming two different fuels) e85 and the other for pump gas. Using this mod allows you to use one or the other at the flip of a switch. But to do this successfully without any hiccups, you need to have a full tank of either pure pump gas or pure e85. Note: e85 fuel settings MUST be in the primary fuel tab, and pump MUST be configured in the Aux maps tab. This needs to be done due to the Global numbers only able to be negative numbers in the Aux map. For e85 you need more fuel (you should know this if you’re going to do the switch, if you don’t quit what you’re doing and SEARCH on e85 swaps) and for gas you have to take away the excess fuel, hence the negative number. In this part I will go over how to set it up.
First thing that needs to be done in link is in the ECU Config section. Then the first thing to do is Simulate the idle switch. You will do this by going to the RPMS/TPS tab in link, and clicking Simulate idle switch from TPS. What this does is, since you unplugged the Idle validation switch your computer has no way to tell you are actually at idle. This may lead to undesired idle and idle surge due to it hunting to figure out what RPM it needs to be at. This takes TPS %, and when it is at 0% it will use that as reference for idle validation. To do this successfully though you need to have your TPS calibrated and set up correctly via this link:
http://www.ecmtuning.com/wiki/v3tpsadj
And:
http://www.ecmtuning.com/demos/initialsetup.html
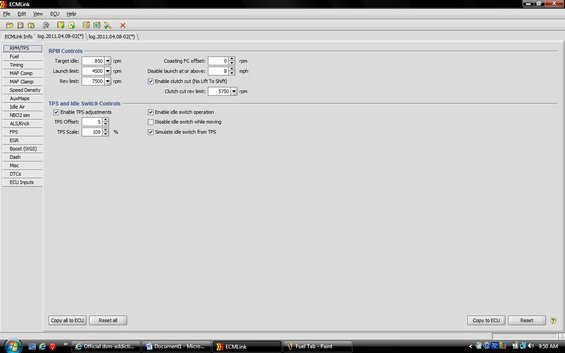
Next you need to calculate the Global fuel setting for you injector size for e85 settings. (deadtime should stay the same, though, no need to change those settings) Here is a link to some good starting points for common injectors:
http://www.ecmtuning.com/wiki/baseinjectordata
Once you find your global starting point (which may need to be tweaked a little bit, due to differences in setups, but should get you very close, if not spot on) you need to set that in the fuel tab of V3.

Next we will set up the Aux maps. Go to the Auxmaps tab. You need to and click: Enable MinOct maps as secondary maps. Then click: use secondary maps when IdleSw input is active. Under the Secondary fuel adjustments you need to click: enable secondary fuel adjustments (applied on top of primary). Then all the way at the bottom click: apply secondary fuel when IdleSw input is active. With these checked, when the switch is on (meaning idle switch is grounded) you will be running the MinOct tables only. With the switch off (meaning switch is open, idle switch not grounded) it will be running MaxOct only. Note: The stock configuration it usually runs in MaxOct tables only and MinOct is usually ignored (in a single fuel/map/tune only), but if the factory ECU sees too much knock for a prolonged period of time it will switch to the MinOct tables as they are more conservative and will prevent you from damaging your car.
Next, you need to set secondary global adjustment. Since this is for your pump gas settings, you need 33.3% less fuel then e85 (1 - 9.8/14.7 = -33.3%), so set it to -33.3%. As on mine, it may not go to that exactly but mine is at -33.2% which is extremely close enough to not be able to tell the difference.

You are now done in the ECU Config section setup and need to move on to the Direct Access.
Now, this is very sensitive information in this section and should only be touched if you got a pretty good idea of how link works. You should not do any tuning to this part unless you know exactly what you’re doing. This is better left to the professionals or someone with a very good understanding of the software.
You will see 4 tabs here that are of interest, LEAVE THE REST ALONE!!!! The four needed are going to be OpenloopMaxOct, OpenloopMinOct, TimingMaxOct, TimingMinOct. With
Assuming you haven’t changed your tables to anything they will be all stock. For using e85 the stock MaxOct tables will be sufficient as it is already very aggressive. So for the most part, until you know what changes to make for what reasons, you can leave these alone. Here are some examples of mine, which have been modified by my tuner to get me a good solid tune for my e85. Please do not copy and paste them into your tables as our setups will be vastly different due to different mods and not all engines act the same.
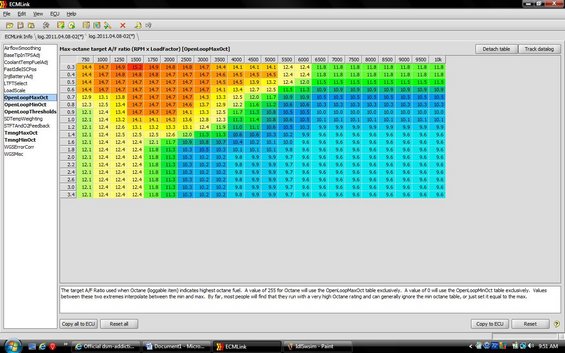
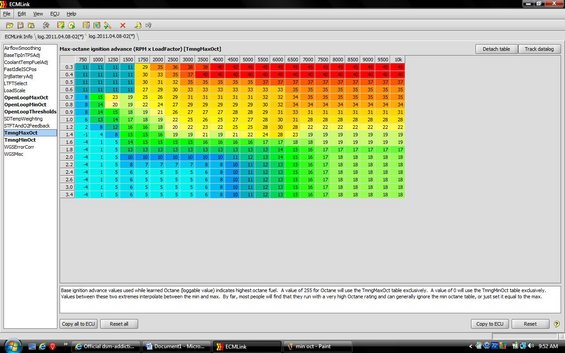
As you can tell my timing was in some places backed down from stock due to it still being too aggressive for conditions. I also was running warmer than normal so it also had affected my tune.
For the MinOct tables, which will be your gasoline tune, a lot of people say the 1g maps are too aggressive once you start modifying different things and starting to tune, so a lot of tuners say to put your MinOct as the stock 2g maps due to them being a little more conservative. I will attach the files with 2g settings to this post and feel free to use them. Here is an example of mine, what they look like, the timing is very altered from stock 2g due to a bad knock sensor at the time and was having some issues so I pulled some time in places. Once again do not copy and paste these ones into your tables as it will be different. Use the 2g maps I attach to this post. Thanks.
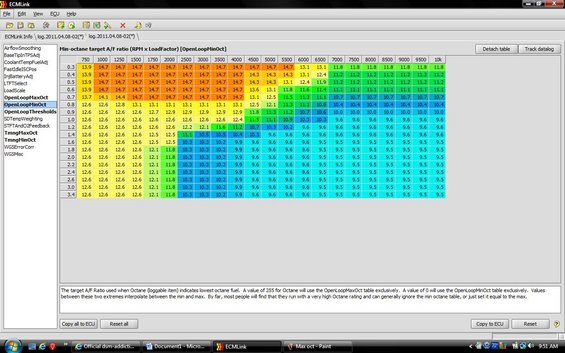
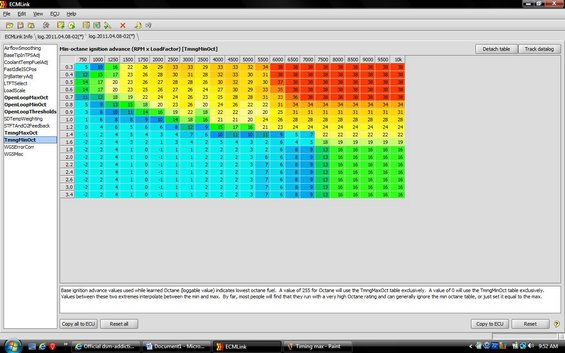
If you compare both Min to Max you can tell that they are very different and more conservative on the Min, which is what is needed for pump gas. With all that, you should be able to set up your basic switchable dual map setup.
Lastly, this mod can also be used for a dual map, same fuel set up. For example, if you only have a pump gas option you can have 2 pump gas tunes, one for everyday, gas saver driving map, then you can have a modified, more aggressive tune for the track at the flip of a switch. This thought can also be applied to e85 for a less aggressive, and more aggressive tunes. The only difference in set up, is you don’t need to enable secondary fuel settings. Just leave that section unchecked. But still enable the MinOct maps the same way.
If you have any questions or anything to add, please feel free to post in this thread or PM me.
Some things you will need is some 16 ga wire, one male spade connector, 2 females spade connectors, one eyelet terminal, and 1 on/off switch (your choice to use what kind you want, I chose a duckbill style), some wire cutters, terminal crimpers, and wire strippers. You can also solder it if you choose, which would be the better option, but at the time I did not have soldering supplies so I did this, if you choose to solder you will also need a soldering iron/gun of your choice, soldering wire, and shrink wrap. Also a heat gun or hair dryer.
Fist thing is to unplug the Idle validation switch from the TB. It will be the one wire sensor where the throttle cables go to pull on the blade. Leave the sensor there though as it functions as your throttle stop as well.

Take your wire and feed the uncut end through your firewall. I used the hood latch grommet and fed it through there.

Once through, pull it too behind the IM and to where the end of the wire is that goes to the validation switch. Strip the end and connect the male spade connector and crimp on. Then connect them and wrap in electrical tape. Zip tie to existing harness to keep out of the way.
Solder: slide shrink wrap on to the wire you fed through the firewall. Cut off the female connector on the existing harness side and strip the wire. Use soldering technique of your choice and then slide shrink wrap over and shrink using a heat gun or hair dryer. Zip tie to existing harness to keep out of the way.


Now you are done in the engine bay, now we can move inside. You may place your switch anywhere you want in the cabin that will be easily accessible to you, but still out of the way and maybe sight that way no one is tempted to mess with it. I chose to do it on the driver side kick panel.


So far no one even knew it was there till I told them. The color of the switch itself very well matches the interior color so it almost is camoflauged. Take the wire you fed through the fire wall and rout it out of the way of pedals and tie up using zip ties. Cut it to length so it will reach the back of the switch in your chosen routed path. Strip the end and put a female spade connecter and crimp. Plug it in to one side of the switch. Then cut enough wire off your roll t o reach from the second terminal of the switch to a grounding point under the dash, I chose to use an existing factory ground behind the kick panel. If your switch does not indicate on or off, use a DMM to check for continuity. You need to know which way is open (off) and which one has continuity (on).
That will finish up the Mechanical part, the next part is all in ECMlink program.
When using the dual maps, you are going to have two different fuel settings. One for (assuming two different fuels) e85 and the other for pump gas. Using this mod allows you to use one or the other at the flip of a switch. But to do this successfully without any hiccups, you need to have a full tank of either pure pump gas or pure e85. Note: e85 fuel settings MUST be in the primary fuel tab, and pump MUST be configured in the Aux maps tab. This needs to be done due to the Global numbers only able to be negative numbers in the Aux map. For e85 you need more fuel (you should know this if you’re going to do the switch, if you don’t quit what you’re doing and SEARCH on e85 swaps) and for gas you have to take away the excess fuel, hence the negative number. In this part I will go over how to set it up.
First thing that needs to be done in link is in the ECU Config section. Then the first thing to do is Simulate the idle switch. You will do this by going to the RPMS/TPS tab in link, and clicking Simulate idle switch from TPS. What this does is, since you unplugged the Idle validation switch your computer has no way to tell you are actually at idle. This may lead to undesired idle and idle surge due to it hunting to figure out what RPM it needs to be at. This takes TPS %, and when it is at 0% it will use that as reference for idle validation. To do this successfully though you need to have your TPS calibrated and set up correctly via this link:
http://www.ecmtuning.com/wiki/v3tpsadj
And:
http://www.ecmtuning.com/demos/initialsetup.html

Next you need to calculate the Global fuel setting for you injector size for e85 settings. (deadtime should stay the same, though, no need to change those settings) Here is a link to some good starting points for common injectors:
http://www.ecmtuning.com/wiki/baseinjectordata
Once you find your global starting point (which may need to be tweaked a little bit, due to differences in setups, but should get you very close, if not spot on) you need to set that in the fuel tab of V3.

Next we will set up the Aux maps. Go to the Auxmaps tab. You need to and click: Enable MinOct maps as secondary maps. Then click: use secondary maps when IdleSw input is active. Under the Secondary fuel adjustments you need to click: enable secondary fuel adjustments (applied on top of primary). Then all the way at the bottom click: apply secondary fuel when IdleSw input is active. With these checked, when the switch is on (meaning idle switch is grounded) you will be running the MinOct tables only. With the switch off (meaning switch is open, idle switch not grounded) it will be running MaxOct only. Note: The stock configuration it usually runs in MaxOct tables only and MinOct is usually ignored (in a single fuel/map/tune only), but if the factory ECU sees too much knock for a prolonged period of time it will switch to the MinOct tables as they are more conservative and will prevent you from damaging your car.
Next, you need to set secondary global adjustment. Since this is for your pump gas settings, you need 33.3% less fuel then e85 (1 - 9.8/14.7 = -33.3%), so set it to -33.3%. As on mine, it may not go to that exactly but mine is at -33.2% which is extremely close enough to not be able to tell the difference.

You are now done in the ECU Config section setup and need to move on to the Direct Access.
Now, this is very sensitive information in this section and should only be touched if you got a pretty good idea of how link works. You should not do any tuning to this part unless you know exactly what you’re doing. This is better left to the professionals or someone with a very good understanding of the software.
You will see 4 tabs here that are of interest, LEAVE THE REST ALONE!!!! The four needed are going to be OpenloopMaxOct, OpenloopMinOct, TimingMaxOct, TimingMinOct. With
Assuming you haven’t changed your tables to anything they will be all stock. For using e85 the stock MaxOct tables will be sufficient as it is already very aggressive. So for the most part, until you know what changes to make for what reasons, you can leave these alone. Here are some examples of mine, which have been modified by my tuner to get me a good solid tune for my e85. Please do not copy and paste them into your tables as our setups will be vastly different due to different mods and not all engines act the same.


As you can tell my timing was in some places backed down from stock due to it still being too aggressive for conditions. I also was running warmer than normal so it also had affected my tune.
For the MinOct tables, which will be your gasoline tune, a lot of people say the 1g maps are too aggressive once you start modifying different things and starting to tune, so a lot of tuners say to put your MinOct as the stock 2g maps due to them being a little more conservative. I will attach the files with 2g settings to this post and feel free to use them. Here is an example of mine, what they look like, the timing is very altered from stock 2g due to a bad knock sensor at the time and was having some issues so I pulled some time in places. Once again do not copy and paste these ones into your tables as it will be different. Use the 2g maps I attach to this post. Thanks.


If you compare both Min to Max you can tell that they are very different and more conservative on the Min, which is what is needed for pump gas. With all that, you should be able to set up your basic switchable dual map setup.
Lastly, this mod can also be used for a dual map, same fuel set up. For example, if you only have a pump gas option you can have 2 pump gas tunes, one for everyday, gas saver driving map, then you can have a modified, more aggressive tune for the track at the flip of a switch. This thought can also be applied to e85 for a less aggressive, and more aggressive tunes. The only difference in set up, is you don’t need to enable secondary fuel settings. Just leave that section unchecked. But still enable the MinOct maps the same way.
If you have any questions or anything to add, please feel free to post in this thread or PM me.

DSM_munky_man- Moocher
- DSM Dedication. : 5032
Join date : 2011-02-08
Location : Avondale, AZ
Page 1 of 1
Permissions in this forum:
You cannot reply to topics in this forum
 Home
Home
